Getting started
Description
This library provides a way to perform Data Augmentation using Variational Autoencoders in a reliable way even in challenging contexts such as high dimensional and low sample size data.
Installation
To install the library run the following using pip
$ pip install pyraug
or alternatively you can clone the github repo to access to tests, tutorials and scripts.
$ https://github.com/clementchadebec/pyraug.git
Pyraug’s spirit & overview
The Pyraug’s library organizes as follows
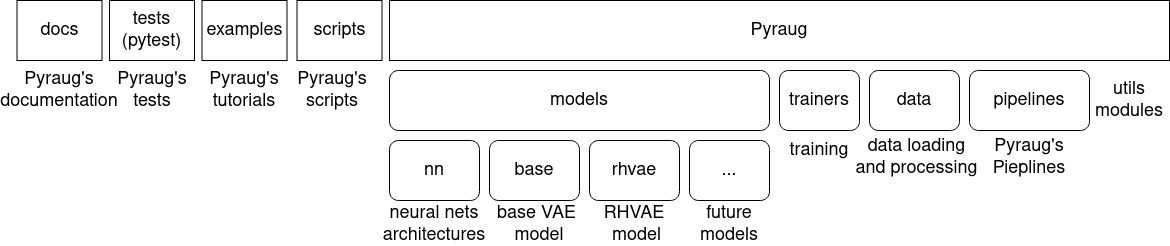 Pyraug’s overview
If you clone the Pyraug’s repository you will access to the following:
docs: The folder in which the documentation can be retrieved.tests: Pyraug’s unit-testing using pytest.examples: A list ofipynbtutorials describing the main functionalities of Pyraug.pyraug: The main library which can be installed withpip.
In the main library, you will access to the following modules:
pyraug.models: This is the module where any Variational Autoencoder model is implemented. It is composed of:
pyraug.models.nn: The module gathers all the neural networks architectures for the encoders, decoders and metrics networks (if applicable) used within the models.
pyraug.models.base: This is the base module of the VAE models.
pyraug.models.other_model: By convention, each implemented model is contained within a folder located in pyraug.models in which are located 4 modules:
model_config.py: Contains a
OtherModelConfiginstance inheriting fromBaseModelConfigwhere the model configuration is stored and aOtherModelSamplerConfiginstance inheriting fromBaseSamplerConfigwhere the configuration of the sampler used to generate new samples is defined.other_model_model.py: An implementation of the other_model inheriting from
BaseVAE.other_model_sampler.py: An implementation of the sampler(s) to use to generate new data inheriting from
BaseSampler.other_model_utils.py: A module where utils methods are stored.
pyraug.trainer: This module contains the main function to perform a model training. In particular, it gathers a
TrainingConfiginstance stating any training parameters and aTrainerinstance used to train the model.pyraug.data: Here are located the modules allowing to load, pre-process and convert the data to types handled by Pyraug.
pyraug.pipelines: In this module can be found Pyraug’s Pipelines. These are functions that allows a user to combine several Pyraug’s modules together.
Please see the full module description for further details.
Augmenting your Data
In Pyraug, a typical augmentation process is divided into 2 distinct parts:
Training a model using the Pyraug’s
TrainingPipelineor using the providedscripts/training.pyscriptGenerating new data from a trained model using Pyraug’s
GenerationPipelineor using the providedscripts/generation.pyscript
There exist two ways to augment your data pretty straightforwardly using Pyraug’s built-in functions.
Using the provided scripts
Pyraug provides two scripts allowing you to augment your data directly with commandlines.
Note
To access to the predefined scripts you should first clone the Pyraug’s repository.
The following scripts are located in pyraug/scripts folder. For the time being, only RHVAE model training and generation is handled by the provided scripts. Models will be added as they are implemented in pyraug.models
Launching a model training:
To launch a model training, run
$ python scripts/training.py --path_to_train_data "path/to/your/data/folder"
The data must be located in path/to/your/data/folder where each input data is a file. Handled image types are .pt, .nii, .nii.gz, .bmp, .jpg, .jpeg, .png. Depending on the usage, other types will be progressively added.
At the end of training, the model weights models.pt and model config model_config.json file
will be saved in a folder outputs/my_model_from_script/training_YYYY-MM-DD_hh-mm-ss/final_model.
Tip
In the simplest configuration, default training_config.json and model_config.json are used (located in scripts/configs folder). You can easily override these parameters by defining your own .json file and passing them to the parser arguments.
$ python scripts/training.py
    --path_to_train_data 'path/to/your/data/folder'
    --path_to_model_config 'path/to/your/model/config.json'
    --path_to_training_config 'path/to/your/training/config.json'
See Setting up your own configurations and tutorials for a more in depth example.
Note
For high dimensional data we advice you to provide you own network architectures. With the
provided MLP you may end up with a MemoryError.
Launching data generation:
Then, to launch the data generation process from a trained model, you only need to run
$ python scripts/training.py --num_samples 10 --path_model_folder 'path/to/your/trained/model/folder'
The generated data is stored in several .pt files in outputs/my_generated_data_from_script/generation_YYYY-MM-DD_hh_mm_ss. By default, it stores batch data of 500 samples.
Tip
In the simplest configuration, default sampler_config.json is used. You can easily override these parameters by defining your own .json file and passing it the to the parser arguments.
$ python scripts/training.py
    --path_to_train_data 'path/to/your/data/folder'
    --path_to_sampler_config 'path/to/your/training/config.json'
See Setting up your own configurations and tutorials for a more in depth example.
Retrieve generated data
Generated data can then be loaded pretty easily by running
>>> import torch
>>> data = torch.load('path/to/generated_data.pt')
Using Pyraug’s Pipelines
Pyraug also provides two pipelines that may be uses to either train a model on your own data or generate new data with a pretrained model.
Tip
These pipelines are independent of the choice of the model and sampler. Hence, they can be used even if you want to access to more advanced feature such as defining your own autoencoding architecture.
Launching a model training
To launch a model training, you only need to call a TrainingPipeline instance.
In its most basic version the TrainingPipeline can be built without any arguments.
This will by default train a RHVAE model with default autoencoding architecture and parameters.
>>> from pyraug.pipelines import TrainingPipeline
>>> pipeline = TrainingPipeline()
>>> pipeline(train_data=dataset_to_augment)
where dataset_to_augment is either a numpy.ndarray, torch.Tensor or a path to a folder where each file is a data (handled data format are .pt, .nii, .nii.gz, .bmp, .jpg, .jpeg, .png).
More generally, you can instantiate your own model and train it with the TrainingPipeline. For instance, if you want to instantiate a basic RHVAE run:
>>> from pyraug.models import RHVAE
>>> from pyraug.models.rhvae import RHVAEConfig
>>> model_config = RHVAEConfig(
...    input_dim=int(intput_dim)
... ) # input_dim is the shape of a flatten input data
...   # needed if you do not provided your own architectures
>>> model = RHVAE(model_config)
In case you instantiate yourself a model as shown above and you do not provided all the network architectures (encoder, decoder & metric if applicable), the ModelConfig instance will expect you to provide the input dimension of your data which equals to n_channels x height x width x .... Pyraug’s VAE models’ networks indeed default to Multi Layer Perceptron neural networks which automatically adapt to the input data shape. Hence, if you do not provided any input dimension an error is raised:
>>> from pyraug.models.base.base_config import BaseModelConfig
>>> from pyraug.models import BaseVAE
>>> config = BaseModelConfig()
>>> BaseVAE(model_config=config)
    Traceback (most recent call last):
      File "<stdin>", line 1, in <module>
      File "/home/clement/Documents/these/implem/pyraug/src/pyraug/models/base/base_vae.py", line 57, in __init__
        raise AttributeError("No input dimension provided !"
    AttributeError: No input dimension provided !'input_dim' parameter of
        BaseModelConfig instance must be set to 'data_shape' where the shape of the data is [mini_batch x data_shape] . Unable to build encoder automatically
Note
In case you have different size of data, Pyraug will reshape it to the minimum size min_n_channels x min_height x min_width x ...
Then the TrainingPipeline can be launched by running:
>>> from pyraug.pipelines import TrainingPipeline
>>> pipe = TrainingPipeline(model=model)
>>> pipe(train_data=dataset_to_augment)
At the end of training, the model weights models.pt and model config model_config.json file
will be saved in a folder outputs/my_model_from_script/training_YYYY-MM-DD_hh-mm-ss/final_model.
Tip
In the simplest configuration, defaults training and model parameters are used. You can easily override these parameters by instantiating your own TrainingConfig and ModelConfig file and passing them the to the TrainingPipeline.
Example for a RHVAE run:
>>> from pyraug.models import RHVAE
>>> from pyraug.model.rhvae import RHVAEConfig
>>> from pyraug.trainers.training_config import TrainingConfig
>>> from pyraug.pipelines import TrainingPipeline
>>> custom_model_config = RHVAEConfig(
...    input_dim=input_dim, *my_args, **my_kwargs
... ) # Set up model config
>>> model = RHVAE(
...     model_config=custom_model_config
... ) # Build model
>>> custom_training_config = TrainingConfig(
...    *my_args, **my_kwargs
... ) # Set up training config
>>> pipe = TrainingPipeline(
...    model=model, training_config=custom_training_config
... ) # Build Pipeline
See Setting up your own configurations and tutorials for a more in depth example.
Note
For high dimensional data we advice you to provide you own network architectures. With the
provided MLP you may end up with a MemoryError.
Launching data generation
To launch the data generation process from a trained model, run the following.
>>> from pyraug.pipelines import GenerationPipeline
>>> model = MODEL.load_from_folder(
...     'path/to/your/trained/model'
... ) # reload the model
>>> pipe = GenerationPipeline(
...    model=model
... ) # define pipeline
>>> pipe(samples_number=10) # This will generate 10 data points
The generated data is in .pt files in dummy_output_dir/generation_YYYY-MM-DD_hh-mm-ss. By default, it stores batch data of 500 samples.
Note
A model can be easily reloaded from a folder using the classmethod load_from_folder that is defined for each model implemented in pyraug and allows to load a model directly from a given folder.
Tip
In the simplest configuration, defaults sampler parameters are used. You can easily override these parameters by instantiating your own SamplerConfig and passing it the to the GenerationPipeline.
Example for a RHVAESampler run:
>>> from pyraug.models.rhvae import RHVAESampler
>>> from pyraug.models.rhvae import RHVAESamplerConfig
>>> from pyraug.pipelines import GenerationPipeline
>>> custom_sampler_config = RHVAESamplerConfig(
...    *my_args, **my_kwargs
... ) # Set up sampler config
>>> custom_sampler = RHVAESampler(
...     model=model, sampler_config=custom_sampler_config
... ) # Build sampler
>>> pipe = generationPipeline(
...    model=model, sampler=custom_sampler
... ) # Build Pipeline
See Setting up your own configurations and tutorials for a more in depth example.
Generated data can then be loaded pretty as explained in Retrieve generated data